Was ist AUSST?
Durch die starke Präsenz von Adobe Produkten in vielen Unternehmen und schwacher Konkurenz sind Anwendungen wie Photoshop oder Illustrator besonders für die Anwender einer der kritischten und wichtigesten Anwendungen. Ließt man allerdings ein wenig durch die Release Notes oder schaut man in den einschlägigen IT News Webseiten tauchen die Adobe Produkte immer mal wieder mit Sicherheitslücken auf. Das Adobe Update Setup Server Tool (AUSST) hilft Administratoren dabei das Update Management vieler Adobe Produkte zu zentralisieren, verwalten und zu steuern. Unter anderem werden dabei auch Netzwerkressourcen im Unternehmen entlastet - mit nur einem einzigen Server.
Wie funktioniert der AUSST?
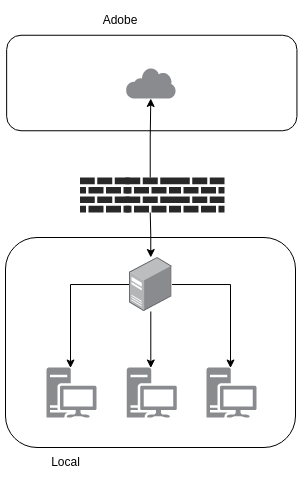
Der AUSST Server lädt zentral die Update von Adobe aus dem Internet auf einem zentralen Server herunter ähnlich zu eines WSUS Server. Dieser Server hält die Update Pakete für die konfigurierten Geräte vor. Dazu wird auf den Geräten die Adobe Create Cloud Desktop Applikation durch eine Config Datei angepasst welche den internen Update Server enthält. Benötigt wird lediglich ein Webserver - in diesem Artikel wird ein Microsoft IIS Webserver genutzt.

Vorteile
- Niedrigere/Zentrale Bandbreiten ins Internet
- Steuerung welche Updates installiert werden
- Single Application Paketierung (Nur Adobe Create Cloud Desktop notwendig)
- Mehrsprachenfähig
Server Konfiguration
IIS Server Vorbereitung
In dieser Anleitung wird auf einer separaten Partition/Festplatte mit dem Laufwerksbuchstaben U die komplette Konfiguration der Webseite sowie die Abspeicherung des Kontents erstellt. Dabei sind 500GB ausreichend. Es empfiehlt sich den Kontent des AUSST von der Systempartition zu trennen.
AUSST Executable
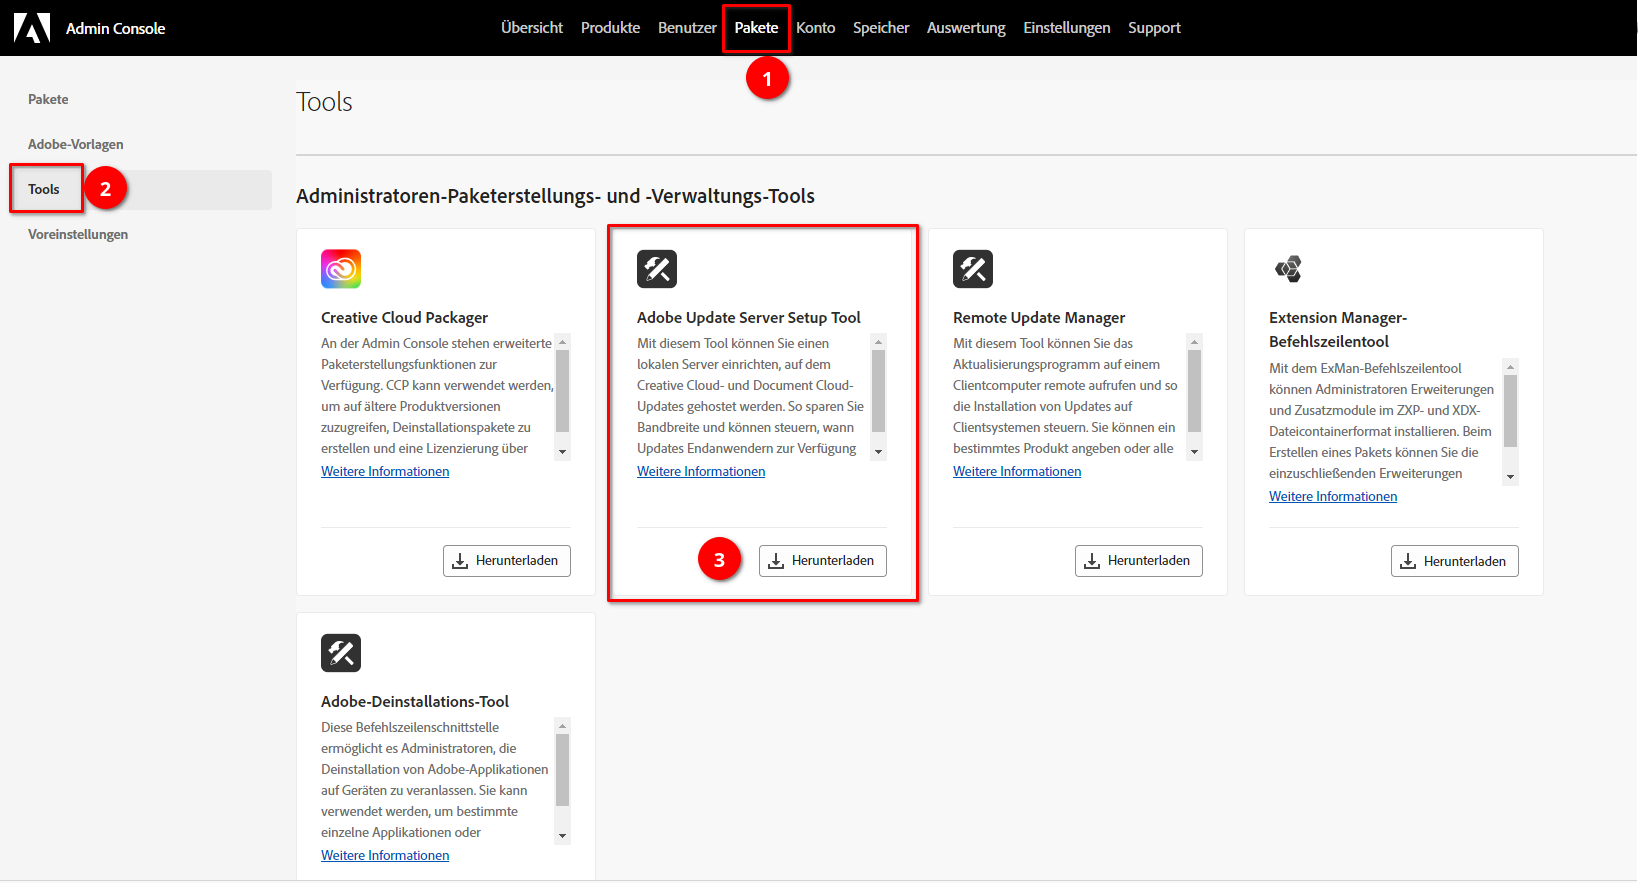
Als erstes muss die namendgebende AUSST Executable heruntergeladen werden. Dazu muss das Adobe Adminportal unter adminconsole.adobe.com aufgerufen werden. Sobald sich erfolgreich mit den Unternehmensdaten angemeldet wurde, kann unter Pakete > Tools das “Adobe Update Server Setup Tool” als Windows Version heruntergeladen werden.

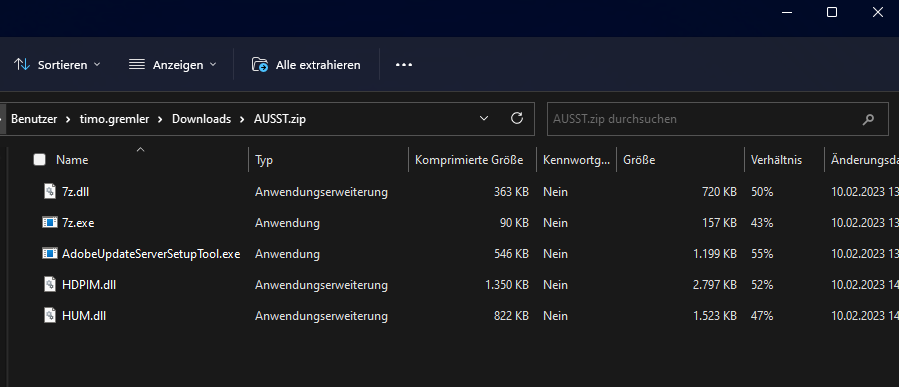
Dabei beinhaltet die ZIP Datei folgende Dateien.

Die ZIP Datei sollte nun unter U:\ abgelegt werden, sodass die Executable unter dem Pfad U:\AUSST\AdobeUpdateServerSetupTool.exe erreichbar ist.
Skript
Zur IIS Vorbereitung kann folgendes Skript genutzt werden. Das Skript tut im groben:
- Einen IIS Applikation Pool mit eigener Webseite auf dem Port 6443
- Fügt diverse benötigte WebHandler und Fileextensions hinzu
- Eine Ordnerstruktur auf dem U:\ Laufwerk erstellen
- Firewall Regeln für Port 6443 erstellen
- Erstellen eines Scheduled Task in der Aufgabenplanung für die periodische Synchronisierung des Kontents und der Erstellung der Client Konfiguration
Für die manuelle Durchführung der Schritte empfiehlt sich diese Anleitung: https://www.wsus.de/ausst/
# +----------------------------------------------------------------------------+
# | Actions |
# +----------------------------------------------------------------------------+
# | - Create a new IIS Site "Adobe Update Server" on Port 6443 |
# | - Create a new AppPool "AUSSTAppPool" |
# | - Configure Firewall |
# | - Create Schedule Task for Sync |
# +----------------------------------------------------------------------------+


# ----
# Execution Policy check
# ----

$Policy = "Unrestricted"


If ((Get-ExecutionPolicy) -ne $Policy) {
	Write-Host "Setting up execution policy" -backgroundcolor black -foregroundcolor green
	Set-ExecutionPolicy $Policy -Scope CurrentUser -Force
	Write-Host "Relaunch this script" -backgroundcolor black -foregroundcolor green
	Exit
}


# ----
# Setup the things we need, Modules, Downloads, variables etc.
# ----

# Server managed module, used to install IIS.
Import-Module ServerManager

# Get the current hostname.
$hostName=(Get-WmiObject win32_computersystem).DNSHostName+"."+(Get-WmiObject win32_computersystem).Domain

# Various Paths.
$InetPubRoot = "U:\Inetpub"
$InetPubLog = "U:\Inetpub\Log"
$InetPubWWWRoot = "U:\Inetpub\WWWRoot"
$InetPubWWWAdobe = "U:\Inetpub\WWWRoot\Adobe"
$InetPubWWWAdobeCS = "U:\Inetpub\WWWRoot\Adobe\CS"
$InetPubWWWAdobeCSConfig = "U:\Inetpub\WWWRoot\Adobe\CS\config"
$InetPubWWWAdobeConfig = "U:\Inetpub\WWWRoot\Adobe\CS\config\AdobeUpdaterClient"
$InetPubLog = "U:\Inetpub\Log"
$IISSiteName = "Adobe Update Server - 6443"
$IISAppPoolName = "AUSSTAppPool"
[string]$IISPort = "6443"

# AUSST tool options, used for the Scheduled Tasks.
$setup="U:\AUSST\AdobeUpdateServerSetupTool.exe"
$setupoptions = "--root=$InetPubWWWAdobeCS --fresh --silent"
$updateoptions = "--root=$InetPubWWWAdobeCS --incremental"
$clientoptions = '--genclientconf="' + $InetPubWWWAdobeConfig + '" --root="' + $InetPubWWWAdobeCS + '" --url="http://' + $hostname + ':' + $IISPort +'/Adobe/CS"'

# ----

# Create our IIS folder structure

# ----

Function createFolder([STRING]$Path)
{
	$exists = Test-Path $Path -pathType container
	if ($exists -eq $false)
	{
		Write-Host "We are going to try and create the folder..." $Path -backgroundcolor black -foregroundcolor green
		try
		{
			New-Item -Path $Path -type directory -Force
		}
		Catch
		{
			Write-Host "Folder creation failed" $Path -backgroundcolor red -foregroundcolor white
		}
	}
	else
	{
		Write-Host "Just reporting this folder exists..." $Path -backgroundcolor black -foregroundcolor green
	}
}


createFolder $InetPubRoot
createFolder $InetPubLog
createFolder $InetPubWWWRoot
createFolder $InetPubWWWAdobe
createFolder $InetPubWWWAdobeCS
createfolder $InetPubWWWAdobeCSConfig
createFolder $InetPubLog

# ----
# Install IIS
# ----

Write-Host "Installing IIS" -backgroundcolor black -foregroundcolor green

try
{
	Add-WindowsFeature -Name web-server, web-mgmt-console, Web-ISAPI-Ext, Web-ISAPI-Filter
}
catch
{
	Write-Host "IIS Install failed." -backgroundcolor red -foregroundcolor white
}

# ----
# Setup IIS
# ----

Import-Module WebAdministration

# Create App Pool and new Website
Write-Host "Setup new IIS AppPool" -backgroundcolor black -foregroundcolor green
New-WebAppPool -Name "AUSSTAppPool"
Start-Sleep -s 10

# Setup App Pool Manager Pipeline mode to Classic
$appPool = Get-Item IIS:\AppPools\AUSSTAppPool
$appPool.managedPipelineMode = "Classic"
$appPool | Set-Item

Write-Host "Create new IIS Website" -backgroundcolor black -foregroundcolor green
New-Website -Name "$IISSiteName" -PhysicalPath "$InetPubWWWRoot" -Port 6443 -ApplicationPool "AUSSTAppPool" -Force

Write-Host "Setup Website LogDirPath" -backgroundcolor black -foregroundcolor green
Set-ItemProperty 'IIS:\Sites\Adobe Update Server - 6443' -name logfile.directory -value $InetPubLog -Force

Write-Host "Setup Directory Browsing" -backgroundcolor black -foregroundcolor green
Set-WebConfigurationProperty -filter /system.webServer/directoryBrowse -name enabled -PSPath 'IIS:\Sites\Adobe Update Server - 6443' -Value true

Start-Sleep -s 10

if (Test-Path "IIS:\Sites\Adobe Update Server - 6443") {Write-Host "$IISSiteName Website created." -foregroundcolor green }

# Setup Module Mappings, httpHandlers and MIME types.
Write-Host "Setup Module Mappings, httpHandlers and MIME types" -backgroundcolor black -foregroundcolor green
$unlockCommand = "$env:WINDIR\system32\inetsrv\appcmd.exe"
$unlockOptions = "unlock config -section:system.webServer/handlers"

Invoke-Expression -Command "$unlockCommand $unlockOptions"

New-WebHandler -Name "AdobeXML" -Path "*.xml" -Verb 'GET,POST' -Modules IsapiModule -ScriptProcessor "C:\Windows\Microsoft.NET\Framework64\v4.0.30319\aspnet_isapi.dll" -PSPath "IIS:\sites\Adobe Update Server - 6443" -RequiredAccess Read -ResourceType File
New-WebHandler -Name "AdobeCRL" -Path "*.crl" -Verb 'GET,POST' -Modules IsapiModule -ScriptProcessor "C:\Windows\Microsoft.NET\Framework64\v4.0.30319\aspnet_isapi.dll" -PSPath "IIS:\sites\Adobe Update Server - 6443" -RequiredAccess Read -ResourceType File
New-WebHandler -Name "AdobeZIP" -Path "*.zip" -Verb 'GET,POST' -Modules IsapiModule -ScriptProcessor "C:\Windows\Microsoft.NET\Framework64\v4.0.30319\aspnet_isapi.dll" -PSPath "IIS:\sites\Adobe Update Server - 6443" -RequiredAccess Read -ResourceType File
New-WebHandler -Name "AdobeDMG" -Path "*.dmg" -Verb 'GET,POST' -Modules IsapiModule -ScriptProcessor "C:\Windows\Microsoft.NET\Framework64\v4.0.30319\aspnet_isapi.dll" -PSPath "IIS:\sites\Adobe Update Server - 6443" -RequiredAccess Read -ResourceType File
New-WebHandler -Name "AdobeSIG" -Path "*.sig" -Verb 'GET,POST' -Modules IsapiModule -ScriptProcessor "C:\Windows\Microsoft.NET\Framework64\v4.0.30319\aspnet_isapi.dll" -PSPath "IIS:\sites\Adobe Update Server - 6443" -RequiredAccess Read -ResourceType File
New-WebHandler -Name "AdobeARM" -Path "*.arm" -Verb 'GET,POST' -Modules IsapiModule -ScriptProcessor "C:\Windows\Microsoft.NET\Framework64\v4.0.30319\aspnet_isapi.dll" -PSPath "IIS:\sites\Adobe Update Server - 6443" -RequiredAccess Read -ResourceType File
New-WebHandler -Name "AdobeJSON" -Path "*.json" -Verb 'GET,POST' -Modules IsapiModule -ScriptProcessor "C:\Windows\Microsoft.NET\Framework64\v4.0.30319\aspnet_isapi.dll" -PSPath "IIS:\sites\Adobe Update Server - 6443" -RequiredAccess Read -ResourceType File -Force


Add-WebConfiguration /system.web/httpHandlers "IIS:\sites\Adobe Update Server - 6443" -AtIndex 3 -Value @{path="*.xml";verb="*";type="System.Web.StaticFileHandler";validate="true"}
Add-WebConfiguration /system.web/httpHandlers "IIS:\sites\Adobe Update Server - 6443" -AtIndex 4 -Value @{path="*.zip";verb="*";type="System.Web.StaticFileHandler";validate="true"}
Add-WebConfiguration /system.web/httpHandlers "IIS:\sites\Adobe Update Server - 6443" -AtIndex 5 -Value @{path="*.dmg";verb="*";type="System.Web.StaticFileHandler";validate="true"}
Add-WebConfiguration /system.web/httpHandlers "IIS:\sites\Adobe Update Server - 6443" -AtIndex 6 -Value @{path="*.sig";verb="*";type="System.Web.StaticFileHandler";validate="true"}
Add-WebConfiguration /system.web/httpHandlers "IIS:\sites\Adobe Update Server - 6443" -AtIndex 7 -Value @{path="*.crl";verb="*";type="System.Web.StaticFileHandler";validate="true"}
Add-WebConfiguration /system.web/httpHandlers "IIS:\sites\Adobe Update Server - 6443" -AtIndex 8 -Value @{path="*.json";verb="*";type="System.Web.StaticFileHandler";validate="true"}
Add-WebConfiguration /system.web/httpHandlers "IIS:\sites\Adobe Update Server - 6443" -AtIndex 9 -Value @{path="*.arm";verb="*";type="System.Web.StaticFileHandler";validate="true"}

#Allow unspecified ISAPI modules
set-webconfiguration system.webserver/security/isapiCGIRestriction -value "True"

#Add MIME-Types
Add-Webconfigurationproperty //staticContent -name collection -value @{fileExtension='.pkg'; mimeType='application/octet-stream'}
Add-Webconfigurationproperty //staticContent -name collection -value @{fileExtension='.msp'; mimeType='application/octet-stream'}
Add-Webconfigurationproperty //staticContent -name collection -value @{fileExtension='.arm'; mimeType='application/octet-stream'}
Add-Webconfigurationproperty //staticContent -name collection -value @{fileExtension='.sig'; mimeType='application/octet-stream'}
Add-Webconfigurationproperty //staticContent -name collection -value @{fileExtension='.dmg'; mimeType='file/download'}

# Copy web.config
Write-Host "Copy web.config file" -backgroundcolor black -foregroundcolor green
$f1 = "$InetPubWWWRoot" + "\web.config"
$f2 = "$InetPubWWWAdobeCS" + "\ACC\services\ffc\icons"
$f3 = "$InetPubWWWAdobeCS" + "\ACC\services\ffc\validation"
createFolder $f2
createFolder $f3
Copy-Item $f1 $f2 -Force
Copy-Item $f1 $f3 -Force

# ----
# Configure Firewall
# ----

Write-Host "Setup Firewall" -backgroundcolor black -foregroundcolor green
New-NetFirewallRule -DisplayName "Allow AUSST Client Connections - Inbound" -Direction Inbound -Action Allow -Protocol TCP -LocalPort 6443
New-NetFirewallRule -DisplayName "Allow AUSST Client Connections - Outbound" -Direction Outbound -Action Allow -Protocol TCP -LocalPort 6443

# ----
# Create the setup tasks and sync tasks.
# ----

Write-Host "Create Schedule Tasks" -backgroundcolor black -foregroundcolor green

# Setup the initial setup task to run in 10 minutes, we can re run this task at a later date as a last resort if we have issues as it will re sync the updates.
#$Action = New-ScheduledTaskAction -execute $setup -argument $setupoptions
#$Trigger = theNew-ScheduledTaskTrigger -Once -At ((get-date) + (New-TimeSpan -Minutes 10))
#Register-ScheduledTask -TaskName AUSST_Setup Adobe -Trigger $Trigger -Action $Action -description "AUSST Setup" -User "NT AUTHORITY\SYSTEM" -RunLevel 1
#Set-ScheduledTask AUSST_Setup Adobe -Trigger $Trigger

# Setup the ongoing sync task.
$Action = New-ScheduledTaskAction -execute $setup -argument $updateoptions
$Trigger = New-ScheduledTaskTrigger -Once -At 23:59PM
Register-ScheduledTask -TaskName AUSST_Update Adobe -Trigger $Trigger -Action $Action -description "AUSST Update" -User "NT AUTHORITY\SYSTEM" -RunLevel 1
$Trigger.RepetitionInterval = (New-TimeSpan -Days 1)
$Trigger.RepetitionDuration = (New-TimeSpan -Days 1)
Set-ScheduledTask AUSST_Update Adobe -Trigger $Trigger


# Setup Client Config Generation, this has to be ran once the server has downloaded the updates, recommend 24Hours.
$Action = New-ScheduledTaskAction -execute $setup -argument $clientoptions
$Trigger = New-ScheduledTaskTrigger -Once -At ((get-date) + (New-TimeSpan -Days 2))
Register-ScheduledTask -TaskName AUSST_Client Adobe -Trigger $Trigger -Action $Action -description "AUSST Client Config" -User "NT AUTHORITY\SYSTEM" -RunLevel 1
-ScheduledTask AUSST_client Adobe -Trigger $Trigger

# FINISH.
Write-Host "Adobe Update Server - created" -backgroundcolor black -foregroundcolor green
AUSST Synchronisation
Die zuvor heruntergeladene Executable wird genutzt um sowohl die Client Konfiguration zu erstellen als auch den benötigten Kontent herunterzuladen.
Die folgenden Befehle können ebenfalls über einen Scheduled Task in der Aufgabenplanung ausgeführt werden oder in einer Batch Datei verpackt werden um diese auszuführen. Die unten aufgeführten Tasks werden automatisch vom Skript erstellt und können nach belieben angepasst werden.

Inkrementelle Synchronisation
Bei einer inkrementelle Synchronisation, wird nur neuer Kontent synchronisiert.
U:\AUSST\AdobeUpdateServerSetupTool.exe --root="/serverroot/updates/Adobe/" --incremental [--proxyusername=proxy_username --proxypassword=proxy_password] [--acrobatonly] [--filterProducts=<Product filter options>] [--filterFilePath=<Product filter filepath>] [--legacyUpdates] [--cleanup]
Ebenfalls kann auch mit dem Befehl --filterProducts=ESHR#3.0 nur bestimmte Produkte und durch den Zusatz einer Version (bspw. #3.0) nur bestimmte Versionen heruntergeladen werden. Dies ist besonders hilfreich um Speicherplatz zu sparen, wenn nur vereinzelt Produkte in der Umgebung genutzt werden.
Die dazu nutzbare Abkürzungen für die Anwendungen ist unter dieser Webseite zu finden.
Fresh Synchronisation
Die Fresh Synchronisation, synchronisiert einmal den kompletten Kontent neu.
U:\AUSST\AdobeUpdateServerSetupTool.exe --root="/serverroot/updates/Adobe/" --fresh [--proxyusername=proxy_username --proxypassword=proxy_password] [--silent] [--acrobatonly] [--filterProducts=<Product filter options>] [--filterFilePath=<Product filter filepath>] [--legacyUpdates]
Client Konfiguration
Die Konfigurationsdatei wird dazu genutzt um dem Programm zu zeigen, wo er nach Updates und Installationsdateien suchen muss.
Konfiguration erstellen
Um die Konfiguration zu erstellen wird ebenfalls die AUSST Executable genutzt. Unten stehender Befehl kanns als Beispiel genutzt werden.
U:\AUSST\AdobeUpdateServerSetupTool.exe –root=“U:\Inetpub\wwwroot\Adobe\CS“ –genclientconf=“C:\inetpub\wwwroot\Adobe\CS\config\AdobeUpdaterClient\“ –url=http://abobeupdate.domain.com:80/Adobe/CS
Konfiguration verteilen
Damit die Anwendungen wissen, dass sie nicht die Update von einem externen Server aus dem Internet holen sollen, müssen die erstellten Konfigurationsdateien (AdobeUpdater.Override) in die folgende Verzeichnisse kopiert werden:
Windows 10
- %SYSTEMDRIVE%\ProgramData\Adobe\AAMUpdater\1.0\
- %SYSTEMDRIVE%\Programme (x86)\Common Files\Adobe\UpdaterResources
macOS
- /Library/Application Support/Adobe/AAMUpdater/1.0/AdobeUpdater.Overrides